

Obtaining GroupWise Cores on SLES 12 and SLES 15
Originally published in March 2019. Updated in Dec 2023
A "Core file" is basically a dump of a running process. It contains a detailed copy of the state of the process at the movement of failure. Developers can use this as a diagnostic tool to follow the code and see where the program failed. Obtaining usable GroupWise core files on SLES 12 and SLES 15 requires some additional work beyond the default SLES and GroupWise configurations. This guide outlines the required configurations and is valid for all GroupWise versions running on SLES 12 and SLES 15 including all versions of GroupWise 18.x and GroupWise 23.4.
There are two types of failure scenarios that you may need to capture a core from. The two scenarios are as follows:
- A GroupWise agent has crashed and is dead or no longer running.
- A GroupWise agent is still running but has become non-responsive and has created a production outage.
The method for gathering a core for each scenario is different, and both are extremely useful for diagnostic purposes.
Note: GroupWise Support will only read cores on currently supported GroupWise versions. You can find out if your version is a supported version here: https://www.microfocus.com/productlifecycle/
Capturing a GroupWise core when the agent crashes or goes dead
This section applies to when the GroupWise agent process has failed completely, meaning it shows as dead, unused, or otherwise is not running when it should be.
ProTip: If your agent has crashed and these configurations are not already set, you won't have a usable core file to submit to GroupWise support. You will need to set these configurations, and then wait for another crash to occur. For this reason, I prefer to make these configuration settings in advance. In the event of a crash in the future, I will immediately have the diagnostic information I need without having to wait for another outage.
Linux Specific Configuration
ULimit Config
Disable the limit for the maximum size of a core dump file. I find that this is generally already set, but you can run it again just to be sure. Run the command:
ulimit -c unlimited
Core Location
Create a location for the dump files. Run the command:
install -m 1777 -d /opt/cores (This is my preferred path for the Core location, but you can change this)
Configure /etc/sysctl.conf
Configure a fixed location for storing core dumps as well as the file format for the core. The %e.%p will capture process names so it's easy to identify what process caused the core. This also sets the necessary kernel parameters to capture the core.
Add the following lines to /etc/sysctl.conf:
kernel.core_uses_pid = 1
kernel.core_pattern=/opt/cores/core.%e.%p
kernel.suid_dumpable=2
Then issue the following command :
sysctl -p /etc/sysctl.conf -w
noelision
The noelision option is not really about creating a core, it's more about preventing a crash in the first place. There are some applications that are susceptible to an Intel CPU hardware bug. GroupWise seems to be one of those applications. Reference this SUSE TID: https://www.suse.com/support/kb/doc/?id=7022289
** NOTE ** The "noelision" issue should not be relevant to SLES 15 SP3 and newer. In all versions of SLES 12 as well as SLES 15, SLES 15 SP1 and SLES 15 SP2, you should have a folder called /lib64/noelision and it should contain the file libpthread-2.22.so. Essentially, if you're running SLES 15 SP3 or newer, this section is likely irrelevant.
Create a file called:
/etc/ld.so.conf.d/noelision.conf
Add the following line to the /etc/ld.so.conf.d/noelision.conf file you just created:
/lib64/noelision (This text should be in the file)
Save the file and run the following command from a terminal prompt:
/sbin/ldconfig (This is a run command)
Disable Apparmor
I've found that when Apparmor is running, it can interfere with the core process. Disable it if you're having crashes and trying to capture cores.
Run the command:
rcapparmor stop
Disable AppArmor in Yast:
Yast --> System --> Services Manager --> apparmor --> Disable
GroupWise Specific Configuration
I used to add some additional debug options to the GroupWise configuration per request of the GroupWise development. However, I am now being told that these options are not required and could actually damage a core and make it less helpful. Therefore I have removed those recommendations from this page.
Capturing a GroupWise core on a running process
This section applies to when the GroupWise agent is no longer responding to client requests, or has otherwise hung, but the process is in fact still running.
Pro Tip: Even if it's not responding or failing to handle requests, you know it's still running because there is no core file at the location you have configured above. Also, if you type in "rcgrpwise status", all of the agents show "running".
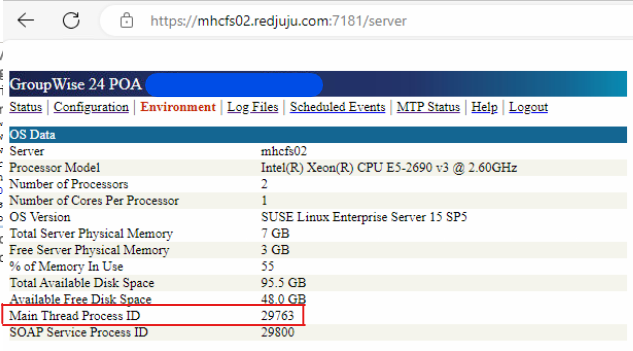
Step 1: Find the Linux Process ID (PID)
The first thing you need to do is find the PID of the malfunctioning GroupWise agent. You can do this a couple different ways:
- From the environment page of the agent.
- This is done in your web browser, connected to the relevant agent through the http console.
- From the Linux command line.
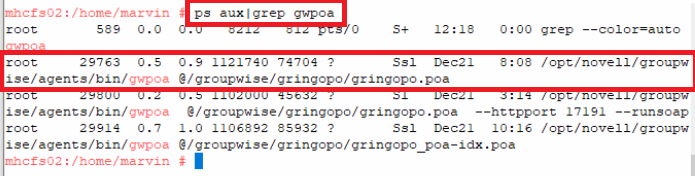
- This is done via the "ps" command. For example, ps aux|grep gwpoa
- substitute the correct agent type: POA = gwpoa; MTA = gwmta; GWIA = gwia; DVA = gwdva
- If multiple processes exist (likely), the first one is typically the primary process and the one that you are concerned about.
Finding the Process ID from the GroupWise HTTP Agent Environment Tab
Finding the Process ID from the Linux Command Line
Step 2: Ensure that you have the "gdb" tool
This process uses the "gdb" development tool. I have found that you may not have it on your system. Based on samplings from various systems, I can confirm the following:
- OES 2018: gdb should be present by default on an OES 2018 system (Based on SLES 12).
- OES 2023: gdb should be present by default on an OES 2023 system (Based on SLES 15).
- SLES 12: unconfirmed status.
- SLES 15: gdb is not installed by default because the development tools module is not typically enabled by default. You will need to install it before you can use it.
Confirm "gdb" is installed via the following command line:
- rpm -qa|grep gdb
- Look for the resulting output "gdb-xx.x-xxxxxx.xx.x.x.x86_64" as shown below. If it is listed, it should be installed. If not listed, you will need to install it. You can also just try to run the "gdb" command from the linux command line, and if it's installed it will run. If not, you'll get an error that it doesn't exist.

If you already have gdb installed, you can skip this portion. If it is not installed, you can install it using this process:
- In Yast, go to Software --> Add-On Products --> Add --> Choose "Extensions and Modules from Registration Server --> and enable the "Development Tools Module".
- From the command line, install gdb using this syntax: zypper install gdb
Step 3: Run the "gdb" command line tool
This sequence will create a core dump file of the running GroupWise process.
Pro Tip: Note the current directory that you're in. The core file will write to this directory. If you want it to write to a specific directory, change to that directory first. Also ensure that you're running as root.
From the command line:
- run this command:
- ulimit –c unlimited
- run this command:
- gdb {agent} {pid}
- for {agent}, enter the actual agent type: POA = gwpoa; MTA = gwmta; GWIA = gwia; DVA = gwdva
- for {pid}, enter the actual pid as discovered in Step 1.
- Example: gdb gwpoa 29763
- gdb {agent} {pid}
- you will see a bunch of activity as gdb is attaching to the process. when finished it will present you with a (gdb) prompt.
At the (gdb) prompt, enter the following command:- generate-core-file
- It will take a little time for gdb to collect the core and write it in the current directory. You should receive a status showing that the core file has been saved, as shown in the output below:

- Enter this command sequence:
- detach
- q
- You will be returned to the command line. The core file that was generated should be located in that same directory that you started in. The image below shows the full sequence.

Pro Tip: This will not affect the currently running GroupWise agent process. It will continue to run. Most likely, you will need to restart the GroupWise agent to restore service. Ensure that you have located the core file, then go ahead and restart the GroupWise agent.
What to do if/when GroupWise hangs or crashes
- If GroupWise has hung or become unresponsive, follow the process using the "gdb" tool above to capture the core file of the running process.
- If GroupWise has actually crashed, based on the configurations that you have previously made, a crash dump file should have been created in the path that you specified in the configuration.
In either case, the core file can be analyzed by GroupWise support to attempt to determine the root cause of the crash. You should do the following:
Locate the Core File for an agent that crashed
- If you followed this guide, The core file for an agent that crashed will be in /opt/cores.
- The file should be named in a way that identifies the process. Based on the instructions above, it should have "GWPOA" in the name since that is the crashing process.
- The core file should also be timestamped the date/time of the GroupWise agent crash.
Locate the Core File for an agent that only hung but was still running
Since you used the "gdb" command line tool to capture a running core of the GroupWise agent, the resulting core file will be found in the directory you were in when you ran gdb. It will be named "core.xxxxx". The xxxxx portion is the PID of the running Linux process.
Restart the GroupWise Agent
- Typically when a GroupWise agent crashes abnormally, a simple restart is all that is needed to get it running again.
- If the GroupWise agent is hung but not crashed, you can typically also just restart it using the standard "rcgrpwise restart" command.
- In some cases you may find it simpler to just restart the server.
Get Support
- Open an SR (Service Request) with OpenText, reference a Crashed or Hung POA that caused a critical outage. Make the priority High or Critical.
- Create a tar.gz file of the core file and name it the same as your SR number. For example SR12345678910.zip. (The core file can be large so compressing it helps manage the size and upload time)
- Upload the core file to the OpenText support site. Each support case requires case-specific credentials, so you must access this directly from your support ticket.
- Let the engineer know that you uploaded the core, and request that someone read your core.
- Wait for further instruction from the GroupWise support team.
The Adventures of Mittens
Follow the adventures of Mittens (The infamous GroupWise administrator) as he uses GroupWise to save the world.