

Updated April 11 2024
If you ever find yourself attempting to troubleshoot GroupWise mailboxes using IMAP and Trusted Applications, you will soon find that it can be a cumbersome process. You will also find that it's very difficult to actually find information that tells you how do be successful in your Trusted App login.
Why would you need this? Well, in my case I was troubleshooting an issue with a customer that uses Barracuda Archiving for long term message storage. It was having issues accessing folders in certain mailboxes, and from the GroupWise client we could not see any problems. So we needed to be able to login to numerous accounts, via IMAP, to determine exactly what the Barracuda archive was dealing with. Furthermore, I wanted to duplicate the process identical to how the Barracuda did, so I needed to login to IMAP with a Trusted Application.
The Trusted Application allows you to login once as a Global Administrator, then access mailboxes without having to know the credentials for each mailbox. This is extremely useful because users do not have to potentially compromise their credentials, nor do you have to talk to, schedule with, or interact with any actual users in any way. What a time saver. If you found this while googling, you may have found references to this process on other sites that are not exactly accurate. Meaning, you can try what they say and it just doesn't seem to work. But you don't really know why. Often times, many assumptions are made, and critical information may be missing from the process. In the end, when I thought I was doing it right, I would receive the following error: "no XGWTRUSTEDAPP (D074)". Once I resolved the issue, I wrote this blog to clarify the issue for anyone else that may be struggling with the same thing.
Step 1: Obtain the necessary Trusted Application info
The starting point is having a proper Trusted Application defined in GroupWise. Creating a Trusted Application in GroupWise is a simple process, but beyond the scope of this article. However, when you create the Trusted App, you give it a name. Then, you're either given a file with a text string, or you are provided with a string that you can copy to the clipboard (Depends on the version). But you should have two things when you are done:
1) Name of the Trusted App, for example: CustomKey
2) Text containing a long string of characters like this: 55EACEE109520000BDCCD173F41F1A3655EACEE209520000956628BF3D2F97F3
If you are missing either of these, follow the path of least resistance and just create a new Trusted Application.
Step 2: Understand the IMAP Login Syntax Requirements
It's important to understand how an IMAP login sequence works, as well as the required syntax components for passing along the GroupWise Trusted App key. The syntax for logging into IMAP with the trusted key is a bit different than you would expect.
First understand the general syntax requirements of IMAP and sequence of events. When you send commands to IMAP, you generally have to preface the command with an arbitary sequence number. I don't fully understand this, only that it requires it. The "A1" below represents this sequence number. As far as I am aware, it could also be just "a", "A1", "A01", "A555", '1" etc. The value seems arbitrary, but is required. If you are reading this and have a reference that explains this syntax, I'd happily appreciate it if you sent me a link so I could include it.
First, initiate the sequence:
- A1 AUTHENTICATE XGWTRUSTEDAPP
Second, supply the Encoded Key of the Trusted App (Without the sequence number):
- XGWTRUSTEDAPP (ENCODED TRUSTED APP KEY)
Third, login as the actual user:
- A1 login lechiffre
If done correctly, you can now use standard IMAP commands to display components of the mailbox. The problem is that you have no idea what it means by the "Encoded Trusted App Key". It's not clear whether this is the long string of characters from when you created the Trusted App or something else. But just using the string from the Trusted App Key will not work, and it will result in a failed login and a D074 error. Continue reading for an explanation of how to get the Encoded Trusted App Key into the proper format.
Step 3: The Encoded Trusted App Key
The missing link is that the Trusted App Key must be converted into a Base 64 String in order to pass it correctly to the IMAP service for authentication. It cannot be used in its native format. What you have to do is manipulate the name and the data from the Trusted App and encode it as a base 64 string, ensuring to follow the required syntax from GroupWise. Then you provide that encoded string during the login process through IMAP.
The Starting Point
You first start with two pieces of data:
- Your Trusted App Name. In the case study used here, the name is:
CustomKey - The Trusted App String. That is the long series of alphanumeric characters obtained when you first created added the Trusted Application in GroupWise. In my case, the string is:
55EACEE109520000BDCCD173F41F1A3655EACEE209520000956628BF3D2F97F3
Concatenate the parts to meet the required GroupWise Syntax
You are required to concatenate the Trusted App name, a NULL character, and the Trusted App String into a single line of text. Example:
- CustomKey[NULL]55EACEE109520000BDCCD173F41F1A3655EACEE209520000956628BF3D2F97F3
Encode the String to Base64 Format
You then take the string and convert it to Base64 format. You will end up with something like this:
- Q3VzdG9tS2V5ADU1RUFDRUUxMDk1MjAwMDBCRENDRDE3M0Y0MUYxQTM2NTVFQUNFRTIwOTUyMDAwMDk1NjYyOEJGM0QyRjk3RjM=
(This output is based on the same Trusted App "CustomKey" and text string used above. Yours will be different.)
STEP 4: Perform the Conversion to Base64
The needed conversion to Base 64 Encoding does not happen automatically, nor can you do it with standard text editors. You need an advanced text editor to perform the required conversion.
The "Notepad++" utility has all the features you need to perform the task. Whether you use Notepad++ or something else, you need a utility that can do the following:
- Properly insert a NULL character
- Properly Convert a string to Base64 format
Note: Notepad++ can be downloaded here: http://notepad-plus-plus.org/
How to perform the conversion using Notepad++
Here is a step by step visual walk-through using Notepad++ to create the encoded string required for IMAP.
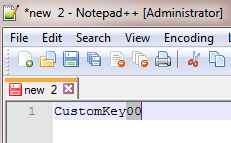
1) Start a new document in Notepad++. Type the name of your Trusted App in the starting position. In my case, CustomKey.

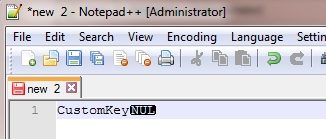
2) Insert a NULL Character.
To do this, enter two number Zero's. Highlight both of the Zero's. Then convert the 00 to HEX. Go to Plugins --> Converter --> Hex -> ASCII. When you do this, the 00's will be replaced with the NULL character in the string. This shows the result of the NUL Character insertion. Though it is difficult to read with the contrast, you can see the letters NUL with a black background:

3) Now paste the original Trusted App key into the document after the NUL character:
NOTE: At this point your string is complete, but you need to perform a conversion of the entire string to base 64 encoding before it can be used for IMAP.

4) Select the entire string using CTRL-A. Everything should be highlighted, there should be no extra spaces or carriage returns.
From the Menu, select Plugins --> MIME Tools --> Base64 Encode with Padding:

5) You should see the entire string change as it is now converted to Base64 Encoding as shown below:

I need to point out a key detail at this step in the process. When I originally wrote this article in 2014, the functionality of Notepad++ was a little different than it is now in 2024. The options for Base64 Encoding have changed and it's important to use the right option for the string to work correctly.
In older versions of Notepad++ the option was Plugins --> MIME Tools --> Base64 Encode.
Current version of Notepad++ the correct option is Plugins --> MIME Tools --> Base64 Encode with Padding.
Whatever version you are using, the end result should be an encoded string that ends with an equal sign (=). If it does not end with an equal sign (=), it will likely not work. When you Base64 Encode with Padding in the current version of Notepad++, it appends the equal sign correctly to the string.
STEP 5: Login to IMAP using Base64 Encoded String
Once you have completed the conversion, you should save the file or copy it to your clipboard for use with Telnet. The following sequence would then be used to login with the trusted key:
The sequence is as follows:
TELNET xx.xx.xx.xx 143 (Use the IP Address of your GroupWise Post Office that has IMAP configured.)
a1 AUTHENTICATE XGWTRUSTEDAPP
+ (You don't type this, you will see this as a response to the previous command)
XGWTRUSTEDAPP Q3VzdG9tS2V5ADU1RUFDRUUxMDk1MjAwMDBCRENDRDE3M0Y0MUYxQTM2NTVFQUNFRTIwOTUyMDAwMDk1NjYyOEJGM0QyRjk3RjM=
On Success, you receive a response "OK XGWTRUSTEDAPP Authentication Successful"
You can then login as the user through the Trusted Application credentials. Do that as follows:
a1 login lechiffre
That should return "a1 OK Login Completed". You can then run any standard IMAP command sequence. The command below lists the folders in the mailbox:
a1 list "" "*"

Example of Incorrect Login Sequence
Below is an example of what happens when you don't have the encoding or syntax correct when you try to login with the Trusted App. In this case, I am using just the alphanumeric string directly from the Trusted App.
TELNET xx.xx.xx.xx 143 (Use the IP Address where IMAP is configured for GroupWise)
A10 AUTHENTICATE XGWTRUSTEDAPP
+
XGWTRUSTEDAPP 55EACEE109520000BDCCD173F41F1A3655EACEE209520000956628BF3D2F97F3
A10 NO XGWTRUSTEDAPP (D708)
On Failure, you receive a response "NO XGWTRUSTEDAPP (D708)" In all of my testing throughout this process I have found that the D708 failure means the encoded string is incorrect and does not match the Base64 Encoding requirements as outlined above. Once I understood properly how to get the Base64 Encoded string, my issues were resolved and I could login successfully.
