

GroupWise Quick Build Sheet (SLES 15)
Here's a quick reference sheet for how I typically build a GroupWise server on Linux. My preference is to use SLES 15, and that is what I outline in this document. This covers the Operating System portion only, it does not cover the actual GroupWise installation.
This is applicable to any version of GroupWise version 18.x and higher, but specifically is applicable to GroupWise 18.3, 18.4, 18.5, 23.4, 24.1, and 24.2. This was written for SLES15 and updated for SLES 15 SP5.
If you'd like to read my discussion regarding the various supported operating systems, click on my "GroupWise Discussion and Best Practices" article.
VMware Server Configuration
Adapt as needed to hypervisor platforms. My preference is VMWare ESXi and anything other than VMWare is out of the scope of this document.
Initial Server OS Build
This process is generally completed using a remote console window in the vSphere vCenter web client. You attach the SLES 15 DVD Image file (.ISO) as removable media and boot from it, invoking the Installation option at the first screen that presents itself.
STEP 1: INITIAL DIALOG AFTER BOOTHING SLES 15 DISC:
Choose "installation" from the menu for a new installation.
- Boot from Hard Disk
- Installation (Choose this one)
- Upgrade
- More...
STEP 2: PRODUCT TO INSTALL:
Choose the first option on the list of products to install:
- SUSE LINUX ENTERPRISE SERVER 15 SP5 (Choose this one)
- SUSE Linux Enterprise High Performance Computing 15 SP5
- SUSE Linux Enterprise Server for SAP Applications 15 SP5
- SUSE Linux Enterprise Desktop 15 SP5
STEP 3: ACCEPT THE LICENSE AGREEMENT:
You must check the box to indicate that you agree to the license terms.
STEP 4: DEFINE NETWORK SESTTINGS:
There are multiple things you need to do on this dialog. The system defaults to DHCP. You do not want DHCP, you want to assign a static network address. There are three (3) main tabs that need to be configured:
- Overview Tab / VMXNET3 Ethernet Controller
- Edit the controller and set a static IP Address / subnet mask / host name.
- Hostname/DNS Tab
- Set the Static Hostname of the system. Use FQDN Format
- Set Hostname via DHCP: NO
- Set at least one (1) nameserver. This is generally an internal server on your network.
- Set Multiple DNS Servers for redundancy.
- Add your internal DNS Domain name to the Domain Search Box.
- Routing Tab
- Add the IP Address of the route/gateway.
- Choose Default Route if this is the default gateway for all traffic. (In most cases, this is true)
- Assign a gateway address to the network adapter under the "Device" drop down tab. It's generally eth0.
- Overview Tab / VMXNET3 Ethernet Controller
STEP 5: SERVER REGISTRATION
Registering the server is required in order to access the required modules and extensions required to run GroupWise. It also allows you to download and install patches from the SLES channel. When you register the server during the installation, it will automatically download and install all available patches during the install, resulting in a fully patched server when you're finished.
- Enter your Email Address
- Enter the SLES registration Code
After Submitting the registration code, it will connect to SUSE.COM, register, and then offer updated repositories during the installation.
- Would you like to enable these repositories during installation in order to receive the latest updates? YES. (Choose Yes)
How to obtain a Registration Code for SLES 15:
Your GroupWise licenses provide entitlements for the SLES 15 Linux OS. You should register the server using SLES registration codes obtained from SUSE.COM. If you cannot find your entitlements through Micro Focus and your existing GroupWise licensing, you may need to discuss with tech support to get the codes synced to your customer account. The process for obtaining a SLES 15 code is as follows:
- Do this on your PC. Don't try to do this from the server you are building.
- Login to your Micro Focus portal account and find the SLES license entitlement/code. It's generally a 16 digit AlphaNumeric code.
-
Login to scc.suse.com. Create account if you don't have one.
-
Click on the Activate subscription in the left-hand menu and follow the prompts through.
- Once it's activated, it can be used to register the server you are building.
What if you cannot find the Code?
- If you are unable to find your registration code, just skip the registration for now. You can add that after the server is built. However, registering it during the installation process simplifies things overall.
- STEP 6: EXTENSION AND MODULE SELECTION:
The following modules and extensions should be installed. The dialog is extremely cumbersome and it jumps around every time you select something. Try not to punch your monitor and just work through the pain as you select these options:
- Basesystem Module
- Desktop Applications Module
- Legacy Module
- Server Applications Module
- Web & Scripting (Only for WebAccess, CalPub, Monitor, and CalServer). Don't install if you don't use those specific apps.
If this is a server that will run GWWEB (standalone or along with the GroupWise agents) also install the following module:
- Containers Module
Note about "Desktop Applications". You may be the type of person that wants to only use a command line, and not install a desktop or a GUI. Typically this is okay however these instructions are taken directly from the GroupWise system requirements. There are also occasions where you may want to bring up a GUI, even if you don't run it all the time. For example, if you need to run a standalone gwcheck on your post office, you'll need a desktop. Plan accordingly.
Note about GWWEB: If you are running this as a standalone GWWEB installation, you don't need a separate disk partition for GroupWise since GWWEB is merely an application, it is not storing data.
STEP 7: ADD ON PRODUCT
You do not need to install any additional add-on products. Leave the box un-selected and hit Next to continue.
STEP 8: SYSTEM ROLE
I don't spend much time worrying about this section. Everybody has opinions and nobody will agree on which one is right. Options to choose from are the following:
- SLES with GNOME (This is generally fine for most situations. You'll have a full Linux system plus a functional desktop GUI)
- Text Mode
- Minimal
- Common Criteria evaluated configuration.
- KVM Virtualization Host (Don't use this if system is virtualized on VMWARE)
- XEN Virtulization Host (Don't use this if system is virtualized on VMWARE)
You may want to use Text Mode or even Minimal in order to conserve resources. However, note that if you choose Minimal, even some of the basic network tools are not installed and this makes things difficult with troubleshooting.
If you're an expert at SUSE Linux you are probably not reading this document anyway. Therefore you are probably fine to select the first option, "SLES with GNOME". You can run the server in text mode after the fact if you choose.
STEP 9: SUGGESTED PARTITIONING
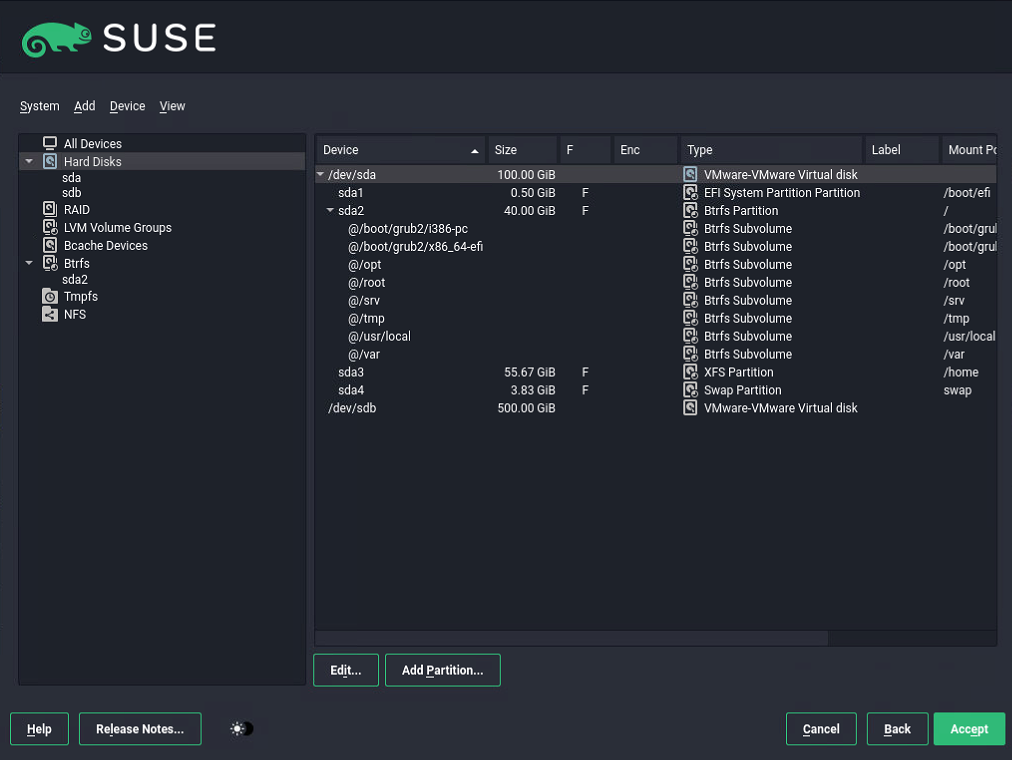
Please understand the following: The Default Suggested partitioning will format most of your system with BTRFS partitions, and it will allocate half of that disk space to the /home partition. This is not what you want. You will waste an enormous amount of disk space.
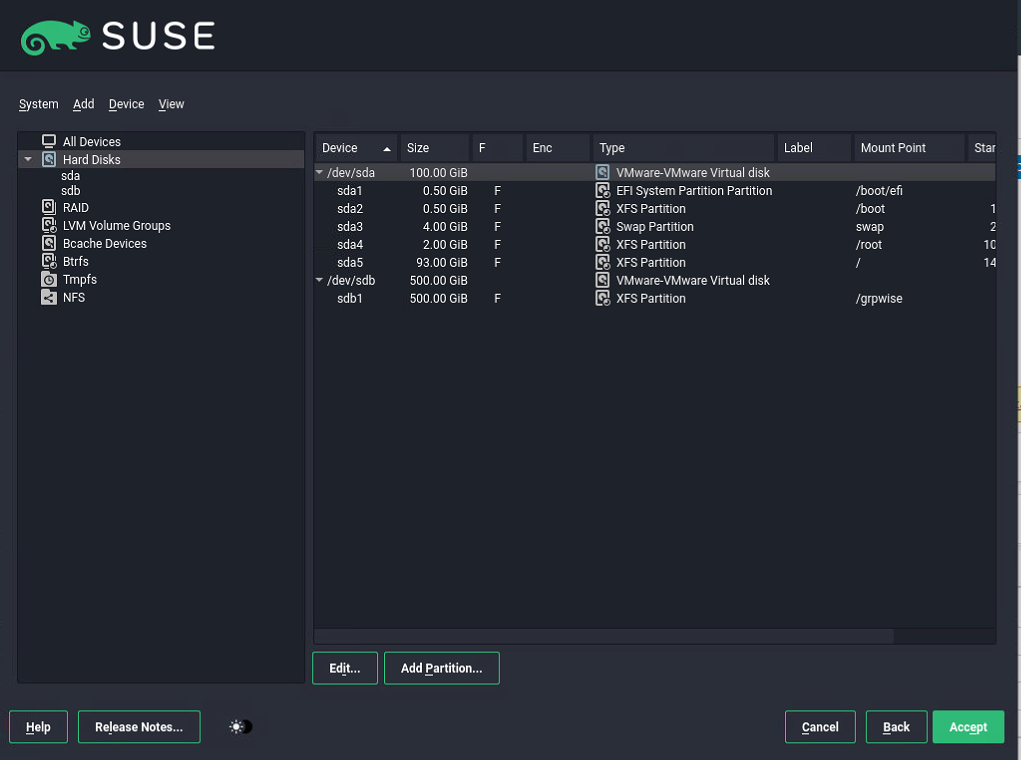
Please install SLES with the disk partitioning as outlined below:
Disk 1 (Boot/OS Disk): XFS File System.
If you followed the hardware configuration guide as outlined above, you should have a device called "sda" that is 100GB with several partitions defined. Since you must change the suggested partitioning from the default, please understand that the dialog for partitioning is complex and can be confusing. It's impossible to explain every step required to accomplish the desired partition strategy. In general, you must remove the unwanted partitions:
- Leave sda1 alone, it's generally the boot partition (either efi or bios)
- Delete sda2 which is the top of the BTRFS partition structure
- Delete sda3 which is the XFS partition allocated to /home.
- Delete the sda4 partition which is generally the swap partition. We'll recreate that.
Once the unwanted partitions are gone, add partitions to match the descriptions as outlined below. Depending on the BIOS type (BIOS or EFI), your needed partition structure will change slightly:
BIOS Setting:
- This disk is usually identified as "sda"
- sda1 = 500 Mib XFS Partition mounted to /boot
- sda2 = 4 GiB SWAP Partition mounted to swap
- sda3 = 2 GiB XFS Partition mounted to /root
- sda4 = Remaining Disk Space XFS File Partition mounted to /
EFI Setting:
- This disk is usually identified as "sda"
- sda1 = 0.50 GiB (512MiB) "EFI System Partition" Partition. Formatted to vfat (FAT) and Mounted to /boot/efi
- sda2 =0.50 GiB (512MiB) XFS Partition mounted to /boot.
- sda3 = 4 GiB SWAP Partition mounted to swap.
- sda4 = 2 GiB XFS Partition mounted to /root
- sda5 = Remaining Disk Space XFS File Partition mounted to /
Note: With the "BIOS" mode, if you skip using a "BIOS Boot Partition", you will get an error stating that "A partition of type BIOS Boot Partition is needed to install the bootloader. It will not be possible to install the bootloader." It will likely still boot because it will write the boot information (mbr) into the disk device. However the best practice is to define the boot partition. In "EFI" mode, if you do not have the boot/efi partition, your system will fail to boot at all.
Disk 2 (GroupWise Data): XFS Partition Type
The disk size was defined in the hardware configuration and should be sized according to your GroupWise size requirements with 25-30% room to grow.
- This disk is usually identified as "sdb"
- Partition should be formatted with XFS filesystem
- Partition should be mounted to /grpwise
DEFAULT SUGGESTED PARTITION vs OPTIMAL PARTITION LAYOUT
Use your mouse to slide the control left or right. The left image is the before (default) partition structure. The right image is the recommended partition structure.
STEP 10: CLOCK AND TIME ZONE:
- Configure to NTP Time source, either an internal local time source or trusted external time source such as 0.pool.ntp.org.
- If using an external time source, ensure your perimeter firewall allows NTP to pass through if you're using an external source.
- Confirm the Time Zone is set correctly.
STEP 11: LOCAL USER (Linux User)
The local user infers that you're setting up a local linux account. It has nothing to do with GroupWise. Create an account with strong credentials for typical administrative access, such as "admin", "gwadmin", "Tech", or whatever. This account is not tied to any other service and has no relation to GroupWise at all. You will use this account for primary ssh access to the server and to do most tasks via SUDO.
STEP 12: ROOT USER Credentials (Linux)
This is where you set the root user for the SLES server that you are building. "root" is the superuser of the linux server. Set a strong password for the root user. It will yell at you if you try to use something that's weak.
STEP 13: INSTALLATION SETTINGS / SUMMARY
You'll arrive at a screen that summarizes the entire installation. The settings you chose previously are outlined in this dialog. For the most part, they should be set correctly as long as you followed the previous instructions. Please check these settings below and confirm they are set as specified:
- Ensure that the Firewall remains enabled.
- Ensure that ssh is enabled.
- Enable the ssh port through the firewall.
CONFIRM INSTALLATION
Go ahead and proceed with the installation. It will now format the disk partitions, install the operating system, and configure according to the specifications set prior to this point.