

GroupWise Web (GWWEB) Best Practices
Applicable to GroupWise GWWEB versions 18.3, 18.4.x, 18.5, 23.4, 24.1, 24.2, 24.3, and newer
GroupWise 18.3 introduced the Web Client "GWWEB", which replaced the previous "GroupWise Webaccess" application that was built on Apache/Tomcat. GWWEB is designed from the ground up and is implemented via Docker Containers to run a self-contained web mail application. There are very few options and it doesn't take much to get going. My goal is to provide real world information that goes above and beyond what you find in the official GroupWise GWWEB product documentation. I'm making the assumption that you've looked at the documentation that can be found here: Setting Up GroupWise Web - GroupWise Installation Guide
Versioning Notice: I initially wrote this document in 2020 when GroupWise 18.3 and the first official iteration of GWWEB was released. As new versions have been introduced, I attempted to note and document the various nuances and changes of each version. However, this just isn't practical anymore. While there are generally some changes and new things in each version, in a practical sense, only the newest version matters. The older versions are mostly irrelevant. In the spirit of providing the most accurate information possibly, and due to my own workload and time constraints, my goal with this document is to provide the best information for the latest GWWEB release.
Important GroupWise 18.5+ Note: It is worth noting that GroupWise 18.5 introduced a major change related to the encoding of the keyfile for the SSL certificate/keypair. If you are running any 3rd party certificates anywhere in GroupWise, please review this link to understand the issue and how to correct it if it applies to you: https://www.redjuju.com/groupwise-18-5-released. You may need to go through and redo your private key files due to this issue, and this could impact your GWWEB implementation as well since it has to interact with the DVA(s) and POA(s).
The following Operating Systems are supported for running Docker and GWWEB:
- SLES 12 SP5, OES 2018 SP3 (Based on SLES 12)
- SLES 15 SP5, OES 2023, OES 23.4/24.x (Based on SLES 15)
Note that there are many differences between SLES 12 and SLES 15. I do not reference SLES 12 at all in this document. My preference is to always use SLES 15. Also, worth noting: While it also may be possible to run GWWEB and Docker on a Windows platform, I do not cover that at all in this document. You will have a very difficult time finding support for GWWEB on Windows if you choose to go down that path. Reference the GroupWise documentation for any questions about this:
GroupWise System Requirements: GroupWise System Requirements
GWWEB Requirements: GroupWise GWWEB System Requirements
The End Result / What To Expect
Much of the GroupWise 23.4 release was rebranding GroupWise from Micro Focus to Opentext. With this release, any previous customization or site-specific branding that could have been done previously was no longer possible. Below is a screenshot of the GroupWise 23.4 GWWeb login screen. Although it does not mean everything is working perfectly, if you get this screen when connecting to GroupWise mail with an Internet browser, you can be confident that the new GroupWise Web application is running. Note that login screen customization was reintroduced to GWWEB in version 24.2.


Updating GWWEB with each new release
If you already have a functional GWWEB implementation, the biggest question that comes up is how to properly update it when a new version is released. Fortunately, this is a pretty simple process that only takes a few minutes.
There are two primary steps in the process:
- Pull and run a new web-config to create/update any relevant config files.
- Pull and run the new gwweb app inside docker.
GWWEB "web-config" Update
Every release of GWWEB has generally brought some new config files into the mix. Therefore, you MUST pull and run a new GWWEB config any time you update. This will create / update the various files that are required to run and operate GWWEB. Failure to do this could result in connection problems or a failed GWWEB after the update. Follow this simple process to fully update your GWWEB Configs:
- Pull a new GWWEB Config from the Microfocus Docker Repository:
-
- # docker pull mfgroupwise/web-config
- # docker run -it -v /opt/novell/gw:/config -e GWADMIN_SERVICE=admin@192.168.5.5:9710 -e GWSOAP_HOST_DEFAULT=192.168.5.7 mfgroupwise/web-config
- Make sure to change the following to fit your environment:
- GroupWise Admin Service login name
- IP Address of the GroupWise Administration service
- Port Number of the GroupWise Administration Service
- The IP Address of one of the Post Offices in your environment (with SOAP enabled, which generally is)
GWWEB Application Update
This process to actually update the GWWEB Application is very straight forward and simple. Follow these easy steps below:
- Pull the new GWWEB application from the Microfocus Docker repository.
- # docker pull mfgroupwise/web:latest
- Stop the current GWWEB application
- # docker stop gwweb
- Remove the current GWWEB application
- # docker rm gwweb
- Launch GWWEB to run the new version you just pulled.
- # docker run -d --restart always -v /opt/novell/gw:/etc/nginx/gw --name gwweb -e FQDN=webmail.redjuju.com -e DNS_SERVER=192.168.1.5 -p 80:80 -p 443:443 -v /opt/novell/gw/certs:/certs -v /opt/novell/gw/logs/:/var/log/nginx/ -e GWSOAP_SSL_VERIFY=off mfgroupwise/web:latest
- Make sure to change the following to fit your environment:
- FQDN of your GroupWise GWWEB Server
- IP Address of an accessible DNS server
- That's it. If it worked before it should work again. If you have issues you can refer to various sections of this page to troubleshoot.
PRO TIPS:
Since you already had GWWEB setup before, the previous command lines you used are likely still in the history buffer of the Linux Console. You can use this to your advantage to easily put in the same commands as before, since the commands themselves do not change. To access the history buffer you can do some of the following:
- # docker run + PAGE-UP Key
- This will populate the command line with the previous "docker run" command. Page up multiple times until you find the one you need.
- # history |grep -i "docker run"
- This will show you any previous command. You can then copy/paste from there.
Confirm the Update was Successful
Once you have docker running after the update, it's easy to confirm that the update was successful. Just login to the GWWEB mail interface, click on the gear in the top right corner, and click "About". This will show you the GroupWise version of the post office you are connected to as well as the version of GWWEB that you are running.
Problems you may Experience
- Certificate Issues: You'll need to ensure that your certificates meet the GroupWise requirements. Each release of GroupWise since 18.3 has tightened down these requirements. If you get any errors during any of the above processes, it's likely that you'll need to check the certificates that your system uses on the GroupWise agents and especially on the DVA.
- Docker Issues: I've seen some problems where docker doesn't load the new gwweb version even though it acts like it should. In this case, I typically find myself scrubbing everything out of docker and ensuring that there are no old or left over bits getting in the way. Over time, even when you follow the above process, the old docker images remain in your system. When this happens, you just have to clean up and remove the old images. These are two things to look at:
- Running Docker Containers
- # docker ps
- Installed Docker Images
- # docker image list
- Running Docker Containers
- Docker Cleanup & Start Over: If you do find yourself needing to clean up Docker and start over, you need to delete/remove/purge out all of the GroupWise currently in the system. It's not always clear what you will need to remove, however there are many resources online available that discuss how to clean up Docker. I consider this link a starting point: Prune unused Docker objects | Docker Docs

Too Long Didn't Read Version (New Install)
This is the process from start to finish that is required to get the new GroupWise Web installed and configured. If everything works perfectly, this is all you need. If you're logged in as root, you do not need the sudo command.
Preparation
- Create the folder /opt/novell/gw/certs
- Copy your 3rd Party commercial certificates into /opt/novell/gw/certs
- Rename your 3rd party certificate files to server.crt and server.key
Command Line Syntax
sudo zypper install docker
sudo systemctl enable docker
sudo systemctl start docker
sudo docker run -it -v /opt/novell/gw:/config -e GWADMIN_SERVICE=admin@192.168.1.1:9710 -e GWSOAP_HOST_DEFAULT=192.168.1.2 mfgroupwise/web-config
sudo docker run -d --restart always -v /opt/novell/gw:/etc/nginx/gw --name gwweb -e FQDN=webmail.redjuju.com -e DNS_SERVER=192.168.1.5 -p 80:80 -p 443:443 -v /opt/novell/gw/certs:/certs -v /opt/novell/gw/logs/:/var/log/nginx/ -e GWSOAP_SSL_VERIFY=off mfgroupwise/web:latest
Notes
Note the following items that must be customized to your specific environment:
- You'll notice I don't actually "pull" the gwweb config or application from the Microfocus docker distribution site. This is because it's not technically necessary. If the code is not already pulled down and present on your system, it will go out and pull it automatically when you invoke the relevant "docker run" command.
- "admin" refers to your GroupWise Administrator user credential. It is not necessarily "admin".
- The IP Address referenced with the GWADMIN_SERVICE directive should be the IP address of your GroupWise Administration service.
- 9710 Is the default GroupWise Admin port but could vary.
- The GWSOAP_HOST_DEFAULT should reference the IP address of one of your GroupWise Post Office Agents. This may or may not be the same as your GroupWise Administration IP Address depending on your environment.
- FQDN should be the full DNS name that users enter to connect to GroupWise Web from the Internet.
- DNS_SERVER IP Address that docker will use for DNS Lookups. Typically a locally accessible internal DNS server that contains entries for your GroupWise environment. (Docker does not utilize your local host DNS configuration located at /etc/resolv.conf, so it must be passed to docker through the command line run option.)
- -e GWSOAP_SSL_VERIFY=off directive added for GroupWise 18.4+. The new certificate and security requirements may fail if your certs are not adequate. This allows you to bypass this check. It is on by default.
Working with Docker for GroupWise Web
I won't go into a ton of detail on Docker in general, but I will cover the basics for use in the GroupWise environment. Instead of installing an RPM module and configuring Apache and tomcat, Docker provides a prebuilt "image" that just runs. It works with a simple configuration file and minimal command-line options. Many applications are now being developed in this manner.
Helpful Docker commands:
| Command | Purpose |
|---|---|
| zypper install docker | Installs the current Docker modules from the SUSE repositories |
| systemctl enable docker | Enables the Docker service to launch on system startup |
| systemctl disable docker | Prevents the Docker service from launching on system startup |
| systemctl start docker | Starts the Docker service |
| systemctl stop docker | Stops the Docker service |
| systemctl status docker | Shows the running status of the Docker service |
| docker image list | Lists the current Docker images |
| docker stop gwweb | Stops the GroupWise Web application within Docker. Docker remains running. |
| docker rm gwweb | Cleans up the GroupWise Web application from within Docker. |
| docker stop gwweb docker rm gwweb docker start gwweb |
Generally used to stop, remove, and then start GroupWise Web. Use this if you need to stop GroupWise Web, make changes or troubleshoot, then start it again. If you have made changes to the "docker run" command line, you will need to follow this sequence. |
| docker restart gwweb | Restarts the GroupWise Web application container. |
| docker pull mfgroupwise/web | Downloads the latest version of GroupWise Web from the Micro Focus Docker repository |
| docker pull mfgroupwise/web-config | Downloads the web-config utility from the Micro Focus Docker repository |
"Docker Run" command line switches for GroupWise Web
The command line required to launch GWWEB via Docker is quite complex. I have provided two tables. The first one explains the generic use of each relevant command line option. The second table outlines each of the options that are relevant/required for running GWWEB.
General "Docker Run" Command Line Options
A good reference for better understanding Docker Commands can be found on the Docker documentation that can be found here: https://docs.docker.com/engine/reference/commandline/run/
Syntax
docker run [OPTIONS] IMAGE [COMMAND] [ARG...]
| Command | Purpose |
|---|---|
| -d (or --detach) | Run container in background and print container ID. This is a no brainer, it wouldn't make sense to not run it in the background. |
| -rm | Automatically remove the container when it exits. |
| --restart | Restart policy to apply to a container.
Restart Always: Restart the container regardless of the exit status. When you specify always, the Docker daemon will try to restart the container indefinitely. The container will also always start on daemon startup, regardless of the current state of the container. (This is my preferred option) Examples: --restart always (preferred) |
| --name | Assign a name to the container. Example: --name gwweb |
| -e (or --env) | Set environment variables Example: -e DNS_SERVER=192.168.0.1 |
| -v | Bind mount a volume. When you use a bind mount, a file or directory on the host machine is mounted into a container. The file or directory is referenced by its absolute path on the host machine. The file or directory does not need to exist on the Docker host already. It is created on demand if it does not yet exist. Reference this link to understand this directive a little better: https://docs.docker.com/storage/bind-mounts/
In the case of GWWEB, many bind mounts are used that help define locations of log files, certificates, and custom images. Example: -v /opt/novell/gw/certs:/certs |
| -p | Publish a container's port(s) to the host. Example: -p 443:443 |
| --add-host | Add a custom host-to-IP mapping (host:ip). Use this if you do not have accessible DNS for name resolution. This is similar to using a hosts file on a server. Example: --add-host gwpo.redjuju.com:192.168.185.13 |
"Docker Run" command line switches for GroupWise Web
The directives below are each of the actual directives needed to launch GWWEB via the Docker Run command.
| Command | Purpose |
|---|---|
| -d | Run the GWWEB application container in the background and displays the container ID on the screen when launched. |
| -rm (Use either -rm or --restart always, you cannot use both) |
This directive will run the GWWEB app but remove the container when docker is stopped. It's more tedious, and I do not prefer it in most cases. When docker restarts, you will have to manually run the Docker Run command to get GWWEB working again. |
| --restart always (Use either -rm or --restart always, you cannot use both) |
I prefer this directive because it will cause the GWWEB app to always run even after the docker service is restarted or if the server itself is restarted. |
| -v /opt/novell/gw:/etc/nginx/gw | There are several configuration files in the /opt/novell/gw folder that define connectivity to your Post Offices and DVA's. This directive does a "bind mount" and puts the files into the GWWEB container, giving GWWEB the ability to read these configuration files needed to connect to GroupWise. |
| --name gwweb | This names the docker container. When starting, stopping, or removing the app, you reference this name.
docker stop gwweb (stops the gwweb container) |
| -e FQDN=webmail.yourserver.com | Specifies the FQDN name of your server. The name in this directive should generally be resolvable from the public Internet (unless you only allow GWWEB from inside your organization. In that case you would still assign a FQDN that is resolvable from inside your organization). |
| -e DNS_SERVER=192.168.0.1 | Docker does not have the ability to use your system defined DNS resolvers. Therefore you must define the DNS server that Docker will use when performing DNS lookups. Note that the DNS server you select needs to be able to resolve the FQDN of your GroupWise Post Offices and DVAs. This doesn't matter as much if you use IP Addresses for them, however the best practice from a security and certificate standpoint is to use FQDN ever since GroupWise 18.4.0. |
| -p 443:443 | This command tells the GWWEB container to publish/map port 443 in the container to the hosts secure https port 443. |
| -p 80:80 | This command tells the GWWEB container to publish/map port 80 in the container to the hosts non secure http port 80. |
| -v /opt/novell/gw/certs:/certs | This tells Docker to use certificates when loading the application. It loads them from the folder listed, which is /opt/novell/gw/certs. I always use this directive, even though the documentation makes it sound more optional. It doesn't even seem practical to try to run GWWEB in a non-secure mode without certificates. |
| -e GWSOAP_SSL_VERIFY=off | I have found that I generally need this statement with any GW 18.4.x version. Without it, Docker can fail to connect to your Post Office(s) due to various problems it detects with the certificates. I struggle with this even if the certificates are perfectly valid. I do not know what triggers a failure, so using this has become a standard directive in most instances of GWWEB that I deploy. |
| -v /opt/novell/gw/logs/:/var/log/nginx/ | This tells Docker to log the GWWEB application in the /opt/novell/gw/logs/ folder. |
|
-v /opt/gwweb/gwlogo.svg:/app/assets/img/app-logo.svg
|
This instructs Docker to load a custom SVG file in place of the default one. The default image is the Blue Square with the white envelope above and to the left of the login prompt. Reference the section about customizing the login screen for more details on this option. |
|
-v /opt/gwweb/graphic.jpg:/app/assets/img/login_image.jpg
|
This instructs Docker to load a custom Graphic image in the background in place of the default one. The default image is the image of 5 people putting their fists together at a table. It is placed in roughly the right 55% of the screen. Reference the section about customizing the login screen for more details on this option. |
| mfgroupwise/web:latest | This should ALWAYS be the last item on the line. It instructs docker what image you are actually running. This "image" is the GWWEB program code that runs inside the Docker Container. In most cases, "mfgroupwise/web:latest" is the correct version. This could vary for a couple reasons:
If you're using something other than the latest, you would replace "latest" with the build number that you installed. |
Feature Parity GroupWise WebAccess vs GroupWise Web
It is important to understand that full feature parity does not exist between the GroupWise Client, the older GroupWise WebAccess 18.2.1, and the newer GroupWise GWWEB. The initial GWWEB 18.3 was severely lacking, but it has improved dramatically with subsequent releases. Reference the "What's New" section of the GroupWise 18 release notes for details on improvements that have been made with each subsequent release. https://www.novell.com/documentation/groupwise18/gw18_readme/data/gw18_readme.html#whats_new
Suggestions for how you might handle concerns about missing features:
- Install the latest available GroupWise WEB version. There are generally no reasons to run older versions, and it has improved dramatically. Continue to update it as new versions are released.
- Continue running GroupWise WebAccess and do not upgrade until more features have been built into GroupWise Web. The older GroupWise WebAccess will continue to function, it is not mandatory to upgrade it to continue to use it. Note that you may get pushback from Micro Focus support if you open a support ticket, and it's unlikely any bug fixes will be provided.
- Run the GroupWise 18.2.1 WebAccess simultaneously alongside GroupWise Web (using different servers)
My personal opinion of GWWEB:
I was not a fan of GWWEB when it was first released. It was very buggy, and severely lacking in features. However, as the product has matured, it has come a long way. I find that GWWEB is now much easier to use than the old WebAccess, and in fact, I don't even like to use the old version anymore. It's too clunky and hard to navigate. I generally recommend that customers start using GWWEB rather than try to continue with the old WebAccess version. While it is drastically different and takes some getting used to, the streamlined simplistic design and improved functionality is a tremendous improvement.
Prerequisites and System Requirements
It's easy to skim over the system requirements and assume everything is set correctly in your existing GroupWise environment. If you do this with GroupWise Web, you will be in for some challenges. Please review the system requirements and confirm that you meet each requirement.
In summary, the requirements are as follows:
-
Docker 19.03.5 or later on any Docker supported platform.
-
GroupWise 18.3 or later system.
-
GroupWise POA with SOAP enabled. SOAP must have SSL enabled.
-
GroupWise DVA with SSL enabled. ** This is likely going to be where you have issues **
-
(Optional) TLS certificates for GroupWise Web.
I have provided detailed notes on how to ensure that your system is configured to meet these requirements below.
Docker 19.03.5 or later on any Docker supported platform.
Note about Multi-Server environments: In a multi-server GroupWise environment, the Docker requirement is only necessary for the actual server running the GroupWise Web application. Docker does not need to be installed on any other server.
To identify the Docker version, use this command at the Linux command line:
rpm -qa|grep docker
This should produce a list of all RPM's that contain the text "docker", and one of them will show the version number. In the results below from my fully patched SLES15 SP2 system, the version of Docker is 19.03.11.
mhcfs02:/ # rpm -qa|grep docker
docker-runc-1.0.0rc10+gitr3981_dc9208a3303f-6.38.2.x86_64
docker-bash-completion-19.03.11_ce-6.34.2.noarch
docker-19.03.11_ce-6.34.2.x86_64
docker-libnetwork-0.7.0.1+gitr2902_153d0769a118-4.21.2.x86_64
NOTE: If no results are returned, Docker is not installed at all. This is normal if it's a new install. The instructions for installing and enabling Docker are further below in this same document.
GroupWise 18.3 or later system.
To ensure your system is running GroupWise 18.3 or later, use this command at the Linux command line on all servers that are running GroupWise Agents (Post Offices and/or Domains):
rpm -qa|grep groupwise-server
This should produce the rpm module that is installed for the GroupWise software. The resulting output should show you the GroupWise version you are running as shown below:
mhcfs02:/ # rpm -qa|grep groupwise-server
groupwise-server-18.3.0-137352.x86_64
A couple points of clarification for this requirement.
- There's an entire best practice process for a GroupWise 18.3 or GroupWise 18.4 system upgrade and it's not included in this document. However, the general recommendation is that the GroupWise WebAccess or GroupWise Web application should be upgraded/installed after all domains and all post offices have been upgraded.
- In a multi-server GroupWise system, if GroupWise Web will be running on it's own separate and/or dedicated server, you likely do not and will not have the "groupwise-server" modules installed on that server. Check the versions on the servers that are actually running GroupWise agents.
GroupWise POA with SOAP enabled. SOAP must have SSL enabled.
It's very likely you meet this requirement already. But you should confirm the configuration anyway. Points to consider:
- SOAP needs to be enabled on ALL Post Office Agents.
- Enabling SSL on the SOAP protocol on your Post Offices is all or nothing. Meaning it's either enabled for ALL applications that use it or it's not enabled. You cannot mix and match between enabled and not enabled. For example, you cannot have SSL enabled on SOAP for use by GroupWise Web if GroupWise Mobility is set to use SOAP via non-SSL.
- To my previous point, If you do not use SSL for soap, you MUST configure and enable it in order for GroupWise Web to function. You must ALSO consider all other applications that may use SOAP. For any application in your organization that connects to GroupWise via SOAP, you MUST enable SSL on the SOAP protocol. Some applications that use SOAP: Legacy GroupWise WebAccess, GroupWise Mobility Service, and the new GroupWise Web application.
Generally speaking, you can confirm that SOAP is configured to use SSL by looking at the running configuration on each Post Office agent. You do this in the POA Web Console that can be launched from the GroupWise Administration page.

| GroupWise POA Configuration Settings |
| Internet Protocol Agent Settings: | |
| IMAP Agent: | Enabled |
| IMAP Port for Incoming IMAP requests: | 143 (Default) |
| IMAP over SSL: | Enabled |
| IMAP SSL Agent: | Enabled |
| IMAP SSL Port for Incoming IMAP requests: | 993 (Default) |
| IMAP Read Limit: | 4000 |
| IMAP Read New: | Enabled |
| SOAP Agent: | Enabled |
| SOAP Port for Incoming SOAP requests: | 7191 |
| SOAP Proxy Port: | 7191 |
| SOAP over SSL: | Enabled |
| SOAP Redirection Table: | Show |
If you find that SSL is not enabled on the SOAP protocol, you will need to install a certificate/key pair on each Post Office agent and enable SSL for SOAP on the agent configuration. SSL configuration is out of the scope of this document.
GroupWise DVA with SSL enabled
When SSL is not enabled on the DVA, GroupWise Web will function but you won't be able to view PDF or other docs from within the GroupWise Web application.
Things to understand about the GroupWise DVA:
- The GroupWise DVA is what allows you to view PDF, DOC, and Image files from within GroupWise.
- Each Post Office generally has its own DVA. (This is not absolutely always true)
- The GroupWise DVA is not enabled for SSL by default.
- All DVA's in your entire GroupWise system need to have SSL enabled.
- The GroupWise Administration Console makes you think you're enabling SSL on the DVA but it's not actually doing what you think. More on this below in step 1 of the DVA required configuration.
If this requirement is not met, you'll experience the two things below.
When SSL is not enabled on the GroupWise DVA, you will receive an error that states "Unable to view attachment" as shown below.

When SSL is not enabled on the GroupWise DVA, you will see the following in the Docker log files when you experience this error.
2021/01/05 08:43:41 [error] 16#16: *43 SSL_do_handshake() failed (SSL: error:1408F10B:SSL routines:ssl3_get_record:wrong version number) while SSL handshaking to upstream, client: 172.17.0.1, server: webmail.redjuju.com, request: "POST /dva HTTP/1.1", upstream: "https://192.168.0.147:8301/dva", host: "webmail.redjuju.com", referrer: "https://webmail.redjuju.com/gw/mailbox/default"
Refer to the Troubleshooting/Log Files section below for information on how to configure and view the log files.
How to configure the GroupWise DVA with SSL Enabled
This four-step process enables the GroupWise DVA with SSL using a self-signed certificate:
1) Tell the POA's to connect to the DVA's via SSL
On the DVA configuration in the GroupWise Administration console, check the box that says "Enable SSL". This tells the Post Office to use SSL when connecting to the DVA. It does not actually configure the DVA with SSL.
Note: It's very confusing, and I don't like the behavior. The dialog makes you believe that you are enabling SSL on the DVA, when in fact you are not. You're only telling the Post Office to use SSL when connecting to the DVA. The checkbox does nothing to actually configure SSL on the DVA. You will need to follow the remaining steps to actually enable SSL on the DVA.
2) Creating the Certificate
Creating the certificates can be accomplished entirely from a SLES 15 Linux command line. The filenames I use are dva.crt, dva.key, and dva.crt. The dva.nopass.key in the first step named "dva.nopass.key" for clarity that it does not have a password at that step.
I like to ensure that I'm in a folder that I have created just for certificates so that I do not get them confused with any other files or certificates.
Create CSR File and Private Key
This command will create the necessary Certificate Signing Request (CSR) and also generate the necessary Private Key file. Note that in this step, the private key file does not contain a password.
openssl req -newkey rsa:2048 -nodes -keyout dva.nopass.key -out dva.csr

Assign a password to the private key
This command will assign a password to the key file you just created. You will be prompted to enter the password.
openssl rsa -in dva.nopass.key -des3 -out dva.des3.key

Sign the CSR and creates the certificate file
This command will sign the certificate and write it to file. When completed, you should find a "dva.crt" file in the same folder.
openssl x509 -in dva.csr -out dva.crt -req -signkey dva.des3.key -days 3650

3) Configure the DVA Startup File
The DVA Startup file now must be configured to load the certificate and key file. In many cases, the DVA startup file is called "gwdva.dva". However, it is also possible that it is called named similar to the Post Office it is associated with. I have found that it could vary depending on how it was created. It could be "poa_name.dva".
On Linux: The DVA Startup file should be located in the /opt/novell/groupwise/agents/share folder.
On Windows: The DVA startup file should be located in c:/Program Files/Novell/GroupWise Server/Agents.

Use your favorite text editor to modify the gwdva.dva file. Locate the section titled "Enable SSL for Https" and add the following four (4) lines to it:
−-httpssl
−-sslCert /opt/iso/certificates/dva.crt
−-sslKey /opt/iso/certificates/dva.des3.key
−-sslKeyPassword $q~Nk:_@@cSxk{3ptCALhlHfc
- Ensure that you put your own Key File password, not the one shown above.
- The Password is in clear text. I am unaware of a way to change this.
- Ensure that the path/filenames specify the correct location of the certificate and key file.

On Windows, the syntax of the DVA startup file is different than on Linux. Additionally, openssl is a Linux command line tool. In order the create the certificates as outlined above, it is perfectly acceptable to create them on the Linux server and then copy them to your Windows server.
| Windows |
| C:/Program Files/Micro Focus/GroupWise Server/Agents/gwdva.dva (or post_office.dva) /httpssl- /sslcert- /sslkey- /sslkeypassword- |
4) Test and Confirm SSL Status on the DVA
Once the configuration changes have been made, log in to the DVA Web interface and confirm that the DVA shows that SSL is enabled and active. The default port is 8301. Assuming you have not changed the default port, you access the Web Agent at the following URL:
https://xx.xx.xx.xx:8301 (Enter the IP address of your Post Office Server here)
If the URL connects securely (and/or asks you to confirm the validity of the certificate), this alone would suggest it is working. However, you can also confirm the status of SSL in the two different places as shown below:
The DVA Log Files will show if HTTPS is inactive.
The verbiage of the logs is a bit vague, but if it shows "https" in the WebConsole URL, then it should be working correctly. I say that it's vague because all traffic, including incoming traffic from the POA, GroupWise Web, and the Web Console page all seem to use this same port, port 8301. This is different in that all other agents use different ports for different functions.
01-11-21 17:53:46   Client/Server Settings:
01-11-21 17:53:46   IP Address: 192.168.2.24
01-11-21 17:53:46   HTTP Port for Incoming Connections: 8301
01-11-21 17:53:46   WebConsole Url: https://192.168.2.24:8301
-----
01-11-21 17:53:46   WebConsole Url: https://:8301  (Also Possible)
** Also to note, if you have not explicitly configured the DVA with an IP address in the "gwdva.dva" startup file, the log file may omit the IP address from the WebConsole URL. The important thing is that it shows HTTPS.
The DVA Web Console will also show status of SSL on the “Configuration” tab. From this page you should see the necessary information about the certificate and status of SSL. Note that HTTP over SSL shows Enabled, and it shows the path to the SSL Certificate and Key File.
| GroupWise Document Viewer Agent Configuration Settings | |
| Configuration Settings | |
| Agent Version | 18.3.0 -137352 (11/15/2020) |
| IP Address | xxx.xxx.xxx.xxx |
| DNS Name | xxx.xxx.xxx.xxx |
| HTTP | Enabled |
| HTTP over SSL | Enabled |
| HTTP Port | 8301 (Default) |
| HTTP Admin Password Required | No |
| Startup File | /opt/novell/groupwise/agents/share/gwdva.dva |
| SSL Certificate | opt/iso/certificate/dva.crt |
| SSL Key File | opt/iso/certificate/dva.key |
(Optional) TLS certificates for GroupWise Web.
This requirement is extremely confusing because it says that TLS certificates for GroupWise Web are optional. Technically speaking, for the end user interface (From the user's mail in a web browser), this is technically correct. However, there are other areas where TLS is absolutely required.
A best practice for security and confidentiality is to use end to end encryption on your GroupWise system. Not using HTTPS for your Web Mail defeats much of the security that the developers of GroupWise have always taken very seriously.
Be aware that this item does not need to be done beforehand. This requirement can be satisfied after everything else is completed. I have provided detailed information on how to accomplish this with a 3rd party commercial certificate further in this document.
Firewall Requirements
Not much is mentioned in the documentation about the Firewall and required settings in the GroupWise Web portion of the documentation. You will have problems if you don't open the right ports.
It is a best practice to ALWAYS ensure the firewall on the server is active and blocking all unnecessary ports. Disabling the firewall can be useful for testing but it should be enabled before you put the system into production.
GroupWise Web Application access to GroupWise Services
The GroupWise Web Docker app needs to be able to connect to various GroupWise Components:
- The GroupWise DVA, generally port 8301
- The GroupWise Post Office via SOAP, generally port 7191
- The GroupWise Administration Service, generally port 9710.
Connecting to GroupWise Web from a Browser or Device
- In order to access GroupWise web, port 443 (HTTPS) needs to be allowed to the GroupWise Web server.
Helpful Firewall Commands
It's difficult to tell you exactly what you need to do with your firewall. Below are some good reference commands that should help you figure it out.
Enable various ports and services on the firewall.
firewall-cmd --permanent --zone=public --add-service=ssh
firewall-cmd --permanent --zone=public --add-service=https
firewall-cmd --permanent --zone=public --add-port=9710/tcp (GroupWise Administration Port)
firewall-cmd --permanent --zone=public --add-port=8301/tcp (Post Office DVA Port)
firewall-cmd --permanent --zone=public --add-port=7191/tcp (Post Office Soap Port)
Put Firewall Changes Into Effect Immediately
Run this command after you've added/deleted a service or port to your firewall list.
firewall-cmd --reload
Start and Stop Firewall Service
systemctl stop firewalld
systemctl start firewalld
Disable and Enable Firewall Service
systemctl disable firewalld
systemctl enable firewalld
Show open services and ports on the firewall
firewall-cmd --list-services
firewall-cmd --list-ports
It should go without saying that the required ports could vary depending on how you have your system setup.
- If you're setting GroupWise Web up on a server that is running all of the GroupWise components (Single Server environment), ports for all the services will need to be opened on the firewall.
- Alternatively, If GroupWise Web is on a dedicated server, or on a server with limited functionality, you'll only open the necessary ports for GroupWise Web to function on that server. However, you will also need to ensure the servers that are running your post offices and admin service have their firewalls configured to allow GroupWise Web to connect.
Adjust your life accordingly.
Installing and Configuring Docker and GroupWise Web
The documentation presents two options for installing the GroupWise Web components without making it abundantly clear that there in fact two entirely different options. Furthermore, the terminology can be confusing and you may not understand exactly what is happening.
The two options are listed below:
- Using the Docker Image (Preferred): This downloads the necessary files from the Micro Focus docker repository on the Internet.
- Using the Micro Focus Download: This uses a downloadable tar.gz file to install docker. The file is obtained as a separate file download from the customer care portal. It is not necessary to download or use this method unless you do not have Internet access on your GroupWise Web server (This would be an extremely rare scenario such as a dark network, or an installation where GroupWise Web is only available to internal systems).
Installation Using the Docker Image (Preferred)
Using the Docker Image is my preferred option, and this is the only method I discuss in this document. This process is an easy three (3) step process that I will outline in detail below. This will follow these steps:
- Install, enable, and start the Docker service
- Download and Run the "web-config" utility
- Download and Run the "GroupWise Web" image
STEP 1: Install, Enable, and Start the Docker Service
In a nutshell, here are the quick and easy steps to get the docker service running:
sudo zypper install docker
sudo systemctl enable docker
sudo systemctl start docker
STEP 1 PART A: Installing Docker
Below is what you should see when you run the “zypper install docker” command. Once it has completed successfully, repeat the “rpm -qa|grep docker” command to confirm that results are returned and the minimum version required is installed.
linux-nd2d:~ # sudo zypper install docker
Refreshing service 'Basesystem_Module_15_SP2_x86_64'.
Refreshing service 'Containers_Module_15_SP2_x86_64'.
Refreshing service 'Desktop_Applications_Module_15_SP2_x86_64'.
Refreshing service 'SUSE_Linux_Enterprise_Server_15_SP2_x86_64'.
Refreshing service 'Server_Applications_Module_15_SP2_x86_64'.
Loading repository data...
Reading installed packages...
Resolving package dependencies...
The following 9 NEW packages are going to be installed:
catatonit containerd docker docker-bash-completion docker-libnetwork
docker-runc git-core libsha1detectcoll1 perl-Error
The following recommended package was automatically selected:
git-core
9 new packages to install.
Overall download size: 50.3 MiB. Already cached: 0 B. After the operation,
additional 235.3 MiB will be used.
Continue? [y/n/v/...? shows all options] (y): y
Retrieving package libsha1detectcoll1-1.0.3-2.18.x86_64 (1/9), 23.2 KiB ( 45.8 KiB unpacked)
Retrieving: libsha1detectcoll1-1.0.3-2.18.x86_64.rpm .................................................[done]
Retrieving package perl-Error-0.17025-1.20.noarch (2/9), 40.5 KiB ( 70.5 KiB unpacked)
Retrieving: perl-Error-0.17025-1.20.noarch.rpm .......................................................[done]
Retrieving package catatonit-0.1.5-3.3.2.x86_64 (3/9), 257.2 KiB (696.5 KiB unpacked)
Retrieving: catatonit-0.1.5-3.3.2.x86_64.rpm .........................................................[done]
Retrieving package docker-libnetwork-0.7.0.1+gitr2902_153d0769a118-4.21.2.x86_64 (4/9), 615.0 KiB ( 1.9 MiB unpacked)
Retrieving: docker-libnetwork-0.7.0.1+gitr2902_153d0769a118-4.21.2.x86_64.[done]
Retrieving package docker-runc-1.0.0rc10+gitr3981_dc9208a3303f-6.38.2.x86_64 (5/9), 2.2 MiB ( 9.2 MiB unpacked)
Retrieving: docker-runc-1.0.0rc10+gitr3981_dc9208a3303f-6.38.2[done (1.2 MiB/s)]
Retrieving package containerd-1.2.13-5.22.2.x86_64 (6/9), 10.8 MiB ( 49.7 MiB unpacked)
Retrieving: containerd-1.2.13-5.22.2.x86_64.rpm ..........................................[done (3.5 MiB/s)]
Retrieving package git-core-2.26.2-3.28.2.x86_64 (7/9), 4.9 MiB ( 30.4 MiB unpacked)
Retrieving: git-core-2.26.2-3.28.2.x86_64.rpm ............................................[done (1.7 MiB/s)]
Retrieving package docker-19.03.11_ce-6.34.2.x86_64 (8/9), 31.4 MiB (143.2 MiB unpacked)
Retrieving: docker-19.03.11_ce-6.34.2.x86_64.rpm .........................................[done (3.2 MiB/s)]
Retrieving package docker-bash-completion-19.03.11_ce-6.34.2.noarch (9/9), 112.1 KiB (113.6 KiB unpacked)
Retrieving: docker-bash-completion-19.03.11_ce-6.34.2.noarch.rpm .....................................[done]
Checking for file conflicts: .........................................................................[done]
(1/9) Installing: libsha1detectcoll1-1.0.3-2.18.x86_64 ...............................................[done]
(2/9) Installing: perl-Error-0.17025-1.20.noarch .....................................................[done]
(3/9) Installing: catatonit-0.1.5-3.3.2.x86_64 .......................................................[done]
(4/9) Installing: docker-libnetwork-0.7.0.1+gitr2902_153d0769a118-4.21.2.x86_64 ......................[done]
(5/9) Installing: docker-runc-1.0.0rc10+gitr3981_dc9208a3303f-6.38.2.x86_64 ..........................[done]
(6/9) Installing: containerd-1.2.13-5.22.2.x86_64 ....................................................[done]
(7/9) Installing: git-core-2.26.2-3.28.2.x86_64 ......................................................[done]
(8/9) Installing: docker-19.03.11_ce-6.34.2.x86_64 ...................................................[done]
Additional rpm output:
Updating /etc/sysconfig/docker ...
(9/9) Installing: docker-bash-completion-19.03.11_ce-6.34.2.noarch ...................................[done]
linux-nd2d:~ #
What if Docker is Not Installed / Won't Install
It's possible that Docker will not install because the server does not have the correct container modules configured from the SUSE repository. Here is output from a failed install attempt.
linux-nd2d:~ # sudo zypper install docker
Refreshing service 'Basesystem_Module_15_SP2_x86_64'.
Refreshing service 'Desktop_Applications_Module_15_SP2_x86_64'.
Refreshing service 'SUSE_Linux_Enterprise_Server_15_SP2_x86_64'.
Refreshing service 'Server_Applications_Module_15_SP2_x86_64'.
Loading repository data...
Reading installed packages...
'docker' not found in package names. Trying capabilities.
No provider of 'docker' found.
Resolving package dependencies...
Nothing to do.
linux-nd2d:~ #
If this happens, you need to enable the "Containers Module" in Yast. To correct this issue, do the following:
- Run the "yast" or "yast2" (Graphical) utility --> Software --> Add System Extensions or Modules.
- Select the "Containers Module 15 x86_64" option --> Next.
- On the Installation Summary screen, click Accept --> Finish.
- Once you have completed this task, retry the Docker installation from the above instructions.
The images below are from the graphical YAST utility and show you what you need to choose.


STEP 1 PART B: Enabling and Starting Docker
The following is what you should see when you run the commands to enable and start docker.
linux-nd2d:~ # sudo systemctl enable docker
Created symlink /etc/systemd/system/multi-user.target.wants/docker.service → /usr/lib/systemd/system/docker.service.
linux-nd2d:~ # sudo systemctl start docker
linux-nd2d:~ # sudo systemctl status docker
â— docker.service - Docker Application Container Engine
Loaded: loaded (/usr/lib/systemd/system/docker.service; enabled; vendor preset: disabled)
Active: active (running) since Tue 2021-01-12 01:31:30 MST; 5s ago
Docs: http://docs.docker.com
Main PID: 13623 (dockerd)
Tasks: 19
CGroup: /system.slice/docker.service
├─13623 /usr/bin/dockerd --add-runtime oci=/usr/sbin/docker-runc
└─13629 docker-containerd --config /var/run/docker/containerd/containerd.toml --log-level warn
Jan 12 01:31:29 linux-nd2d systemd[1]: Starting Docker Application Container Engine...
Jan 12 01:31:29 linux-nd2d dockerd[13623]: time="2021-01-12T01:31:29-07:00" level=info msg="SUSE:secrets ::>
Jan 12 01:31:29 linux-nd2d dockerd[13623]: time="2021-01-12T01:31:29.919159271-07:00" level=warning msg="fa>
Jan 12 01:31:29 linux-nd2d dockerd[13623]: time="2021-01-12T01:31:29.921417883-07:00" level=warning msg="fa>
Jan 12 01:31:29 linux-nd2d dockerd[13623]: time="2021-01-12T01:31:29.922013183-07:00" level=warning msg="co>
Jan 12 01:31:29 linux-nd2d dockerd[13623]: time="2021-01-12T01:31:29.922049557-07:00" level=warning msg="co>
Jan 12 01:31:29 linux-nd2d dockerd[13623]: time="2021-01-12T01:31:29.922067063-07:00" level=warning msg="co>
Jan 12 01:31:30 linux-nd2d dockerd[13623]: time="2021-01-12T01:31:30.051692650-07:00" level=warning msg="Yo>
Jan 12 01:31:30 linux-nd2d systemd[1]: Started Docker Application Container Engine.
STEP 2: Download & Run the web-config Utility
The web-config utility is a tool that queries your GroupWise system and creates a configuration file called web.conf at /opt/novell/gw. GroupWise Web will use this file to connect to GroupWise.
When you run the command below, Docker will retrieve the necessary files from the Internet repository. It will then ask you for a password. While it doesn't specify what password it's asking for, it wants the GroupWise Administrator password which you can see is "admin" in the syntax.
docker run -it -v /opt/novell/gw:/config -e GWADMIN_SERVICE=admin@192.168.2.5:9710 -e GWSOAP_HOST_DEFAULT=192.168.2.5 mfgroupwise/web-config
Notes
Note the following items that must be customized to your specific environment:
- "admin" refers to your GroupWise Administrator user credential. Adjust accordingly.
- The IP Address referenced with the GWADMIN_SERVICE directive should be the IP address of your GroupWise Administration service.
- 9710 is the default port for the GroupWise Administration connection. Modify as needed for your environment.
- The GWSOAP_HOST_DEFAULT should reference the IP address of one of your GroupWise Post Office Agents. This may or may not be the same as your GroupWise Administration IP Address depending on your environment.
Running the web-config command
After you run this command and enter the GroupWise administrator password, the utility writes to the web.conf file and returns to the command line with no further output.
linux-nd2d:~ # docker run -it -v /opt/novell/gw:/config -e GWADMIN_SERVICE=admin@192.168.2.5:9710 -e GWSOAP_HOST_DEFAULT=192.168.2.5 mfgroupwise/web-config
Unable to find image 'mfgroupwise/web-config:latest' locally
latest: Pulling from mfgroupwise/web-config
d121f8d1c412: Already exists
75deccc0fc24: Pull complete
690f480f5f48: Pull complete
b20f9556d3e0: Pull complete
80a6110a9935: Pull complete
Digest: sha256:1ba801e96679729ff970a454fafca55047107aef52be9668e57f65d471fd5ae9
Status: Downloaded newer image for mfgroupwise/web-config:latest
Please enter the password:
Configuration Files used for GWWEB
The number of individual configuration files has generally changed with each new version of GWWEB. This is because new features and integrations are continually being added. If you use the syntax as outlined in this document, the location of these files will be in the /opt/novell/gw folder. Below is a list of files currently provided when running a GroupWise 24.3 GWWEB service. Each file serves a specific purpose and is populated with information obtained when querying the GroupWise administration services.
- /opt/novell/gw
mhcfs11:/opt/novell/gw # l
total 24
drwxr-xr-x 6 root root 157 Jul 19 08:04 ./
drwxr-xr-x 3 root root 16 Jul 13 2022 ../
-rw-r--r-- 1 root root 1220 Jul 19 08:04 ca.crt
drwxr-xr-x 2 root root 42 Feb 27 2023 certs/
drwxr-xr-x 2 root root 63 Jul 19 08:04 customlogin/
-rw-r--r-- 1 root root 123 Jul 19 08:04 dvas.conf
-rw-r--r-- 1 root root 46 Jul 19 08:04 env.list
drwxr-xr-x 2 root root 41 Dec 22 2023 logs/
-rw-r--r-- 1 root root 325 Jul 19 08:04 poas.conf
drwxr-xr-x 2 root root 22 Jul 19 08:04 smg/
-rw-r--r-- 1 root root 122 Jul 19 08:04 smg.conf
-rw-r--r-- 1 root root 788 Jul 19 08:04 web.conf
STEP 3: Download & Run GroupWise Web
This command goes out to the Docker repository on the Internet and downloads the main GroupWise Web application:
docker pull mfgroupwise/web
Then launch the GroupWise Web application using this command line:
docker run -d --rm -v /opt/novell/gw:/etc/nginx/gw --name gwweb -e FQDN=webacc.acme.com -e DNS_SERVER=192.168.1.5 -p 80:80 -p 443:443 -v /opt/novell/gw/certs:/certs -v /opt/novell/gw/logs/:/var/log/nginx/ mfgroupwise/web:latest
Notes
Note the following items that must be customized to your specific environment:
- FQDN should be the full DNS name that users enter to connect to GroupWise Web from the Internet.
- DNS_SERVER IP Address that docker will use for DNS Lookups.
GroupWise Web SSL Considerations
If you recall the former WebAccess configuration, the Apache web service uses a configuration file with a comprehensive set of directives to fully control the SSL certificates. In short, Docker does not use a configuration file for SSL configuration. You must use the command line to load SSL Certificates. There are several items to consider when working with 3rd party SSL certificates and the new GroupWise Web.
Command Line SSL Directives
To use a commercial 3rd party certificate with GroupWise Web, you are instructed to add a certificate path to the command line of the docker run statement. You'll notice that there are no certificate or key files specified, only the path.
From the documentation:
Self Signed SSL Certificates vs. 3rd Party Commercial Certificates
What the documentation fails to mention is that the command line above only creates default self-signed certificates at the path specified. The Docker / GroupWise Web installation process does not do anything with your previous 3rd party SSL certificate. It does not create them. It does not manage them. It does not import them from WebAccess. Docker will only use your 3rd party commercial certificates if they already exist in the "certs" folder and match the file names "server.crt" and "server.key".
3rd Party SSL Certificate and Key Files
Complete these tasks below to configure GroupWise Web with a 3rd party certificate:
- Ensure there is a folder called /opt/novell/gw/certs
- Copy your 3rd Party commercial certificates into /opt/novell/gw/certs folder
- Rename your 3rd party certificate file to server.crt
- Rename your 3rd party key file to server.key. Ensure the key file does not require a password.
- Start or restart the docker services to activate the new certificates.
Here are some key points to understand:
Fact #1. Docker does not care whether you use self-signed certificates or if you obtain a commercial 3rd party certificate. The only concern is that it finds "server.crt" (certificate file) and "server.key" (key file) in the defined certificate path.
Fact #2. If Docker creates the certificate, it will be a self-signed certificate/key pair with files named "server.crt" and "server.key". It will create the two files in the certificate path if they do not already exist.
Fact #3. For a commercial 3rd party SSL certificate to function, Docker requires that the certificates are copied into the certificate path and named "server.crt" and "server.key".
Incomplete Certificate Chain
Your certificate chain will most likely be incomplete because there is no directive in the command line to load an Intermediate or Chain certificate. To overcome this obstacle, you concatenate the certificate file and the intermediate certificate file into the same server.crt certificate. The following command will accomplish this task:
cat My_CA_Bundle.ca-bundle >> /opt/novell/gw/certs/server.crt
Note: Substitute the actual intermediate or chain certificate from your commercial certificate provider in place of the bundle file listed in the syntax.
Industry Standards and Compliance
It's important to understand that unlike Apache, you do not have the ability to fine tune the SSL Ciphers, TLS Protocols, etc. From the GroupWise documentation:
TLS for GroupWise Web defaults to Intermediate configuration. Please visit https://wiki.mozilla.org/Security/Server_Side_TLS for additional details. If you configure GroupWise Web with your own TLS certificates, the must be compatible with the Intermediate configuration as well as the GroupWise requirements.
While this may seem limiting at first, you'll be pleased to find that out of the box you should get an "A" grade. Doing this with Apache with the previous versions was much more cumbersome. You can see that only TLS 1.2 and TLS 1.3 are running with some of the strongest ciphers.


Access from Older Devices
Since GroupWise Web is only enabled with TLS v1.2 and TLS v1.3, it's plausible to believe that some older devices may not be able to connect. For example, older devices that only support TLS v1.1 will fail to connect. There does not appear to be a way to enable older TLS versions, so this should be considered if it's applicable to your environment.
Troubleshooting / Miscellaneous Issues
This section shows you how to enable logging within the Docker GroupWise Web application. It also covers a short list of various issues or error conditions you may encounter during your installation and configuration of the GroupWise Web docker application.
Enabling Logging on the GroupWise Web Docker Application
Add the following command to your "docker run....." command to enable logging.
-v /opt/novell/gw/logs/:/var/log/nginx/
Here is an example of the full "docker run" command that includes logging:
docker run -d --restart always -v /opt/novell/gw:/etc/nginx/gw --name gwweb -e FQDN=webmail.redjuju.com -e DNS_SERVER=172.16.4.78 -p 80:80 -p 443:443 -v /opt/novell/gw/certs:/certs -v /opt/novell/gw/logs/:/var/log/nginx/ mfgroupwise/web:latest
Notes about Logging
Here are some things you need to know about how logging works:
- The directive above will create log files at /opt/novell/gw/logs.
- The "error.log" file is where you'll look to troubleshoot most issues with GroupWise Web.
- There are several "-v" directives that reference specific paths. You're not replacing any of the existing -v directives, you're adding a new one.
- Don't just add the directive to the end of the command line. I found that GroupWise Web won't load correctly if you do this. Instead, put it after the previous "-v" directive and before the "mfgroupwise/web:latest" directive.
Docker Container Logging
You can learn a lot about what Docker is doing with GWWEB by logging the docker process itself.
At the command line, run the following:
docker logs --timestamps --details --follow gwweb
Note that this command follows the log much like the standard "tail -f" command does. However, it will stop logging if the GWWEB application is stopped or not running.
If I am having problems with GWWEB, I will start the docker application (via docker run ....) and then start the docker logs process as shown above. While I may or may not see any errors, I can at least see some activity and feel better that something is happening.
GWWEB 18.4 introduced some additional startup scripts that query each post office and DVA in your system. It requests and confirms that the certificates are valid, and then it caches them for use during runtime. The more post offices/DVA's you have, the longer this process will take. You should see that these scripts are running when you utilize this troubleshooting method.
Here is a sample of what you should see with the GWWEB Docker app:
server:/opt/novell/gw/certs # docker logs --timestamps --details --follow gwweb
2022-07-14T04:07:52.876153832Z startup.sh: Running startup scripts...
2022-07-14T04:07:52.878257719Z startup.sh: Running certs-ca-update.sh...
2022-07-14T04:07:52.890133698Z certs-ca-update.sh: /etc/nginx/gw/poas.conf exists.
2022-07-14T04:07:52.890530996Z certs-ca-update.sh: Requesting certificate of mhcfs02.redjuju.com:7191 server
2022-07-14T04:08:02.906316005Z certs-ca-update.sh: Requesting certificate of mhcfs02.redjuju.com:7191 server
2022-07-14T04:08:12.914415327Z certs-ca-update.sh: /etc/nginx/gw/dvas.conf exists.
2022-07-14T04:08:12.914873965Z certs-ca-update.sh: Requesting certificate of mhcfs02.redjuju.com:8301 server
2022-07-14T04:08:22.922555790Z certs-ca-update.sh: Copying /etc/nginx/gw/ca.crt file
2022-07-14T04:08:22.930236166Z certs-ca-update.sh: Upstream servers certificates are available. Updating the CA...
2022-07-14T04:08:22.936338032Z certs-ca-update.sh: Updating certificates in /etc/ssl/certs...
2022-07-14T04:08:24.205586096Z certs-ca-update.sh: 1 added, 0 removed; done.
2022-07-14T04:08:24.206434176Z certs-ca-update.sh: Running hooks in /etc/ca-certificates/update.d...
2022-07-14T04:08:24.208333264Z certs-ca-update.sh: done.
2022-07-14T04:08:24.213443073Z startup.sh: Running certs.sh...
2022-07-14T04:08:24.220437766Z startup.sh: Running ep.sh...
2022-07-14T04:08:24.240699496Z startup.sh: Startup scripts completed
HTTP response code: 401 for URL
During the Docker "web-Config" phase, if you receive an error such as this, it means a connection could not be established to the GroupWise Administration service.
GWADMIN_SERVICE=admin@192.168.1.1:9710 -e GWSOAP_HOST_DEFAULT=192.168.1.2 mfgroupwise/web-config
Please enter the password:
java.io.IOException: Server returned HTTP response code: 401 for URL: https://192.168.1.242:9710/gwadmin-service/list/POA
at java.base/sun.net.www.protocol.http.HttpURLConnection.getInputStream0(Unknown Source)
at java.base/sun.net.www.protocol.http.HttpURLConnection.getInputStream(Unknown Source)
at java.base/sun.net.www.protocol.https.HttpsURLConnectionImpl.getInputStream(Unknown Source)
at com.microfocus.gw.AdminService.sendRequest(AdminService.java:173)
at com.microfocus.gw.poa.POAMain.getPOAList(POAMain.java:48)
at com.microfocus.gw.poa.POAMain.process(POAMain.java:78)
at com.microfocus.gw.ConfigMain.main(ConfigMain.java:59)
Confirm the following:
- You have the correct IP address and port number for the GroupWise Administration Service.
- You used the correct username and password for the GroupWise Administration. Note the userID is passed on the command line, while you are then prompted for the password.
- Ensure your GroupWise Administration service is functional.
- Ensure the Firewall on the GroupWise Administration server allows a connection to port 9710 (Default) from the GroupWise Web server.
- Ensure the GroupWise Web server has a route to the Administration service, in the case where GroupWise Web is running on a separate network segment such as a DMZ.
WARNING: IPv4 fowarding is disabled. Networking will not work.
You may receive this error with your "docker run" command.
mhcfs01:/opt/novell/gw # docker run -d --rm -v /opt/novell/gw:/etc/nginx/gw --name gwweb -e FQDN=mailserver.mydomain.com -e DNS_SERVER=192.168.72.15 -p 80:80 -p 443:443 -v /opt/novell/gw/certs:/certs -e GWSOAP_SSL_VERIFY=off -v /opt/novell/gw/logs/:/var/log/nginx/ mfgroupwise/web:latest
WARNING: IPv4 forwarding is disabled. Networking will not work.
f3d5cce18324aaba01e30c5c4c68d2caa5ce0bfad67c43858cf0fcce122502d9
When this happens you will find that your docker container will abort shortly after loading.
The solution is a simple sysctl.conf tweak. It involves two easy steps:
- Edit the file /etc/sysctl.conf and add the following line to it:
net.ipv4.ip_forward=1
- Activate the setting with the following command line statement:
sysctl -p /etc/sysctl.conf -w
You should receive the following confirmation that the setting is now set to 1 (instead of 0):
net.ipv4.ip_forward = 1
Try to run the "docker run ...." command and it should not produce the IPv4 warning, and you should now be able to confirm that GWWEB is running.
Port Conflict with Apache/Tomcat
If you're upgrading your system from a previous GroupWise version, you may have an issue starting Docker/GroupWise Web due to the fact that Apache/Tomcat services are still installed and running. The GroupWise Web install process does not stop, disable, or uninstall any previous GroupWise WebAccess service. If your old WebAccess is still running, you will experience port conflicts between the old and new services.
b600bafbbb166b1a41a5c22501678505ba6f61b9d094b29fe9306a183f6f81da
docker: Error response from daemon: driver failed programming external connectivity on endpoint gwweb (3716a5bce08a030b9cbbf4d4b41f703f2cb2adec113fe3e35d91cd5567f3ac36): Error starting userland proxy: listen tcp 0.0.0.0:443: bind: address already in use.
*Note* It doesn't seem to be an issue to have the WebAccess application and apache/tomcat services installed, they just need to be disabled/stopped to avoid the conflicts. I recommend ONLY disabling these services until you are confident in your Docker / GroupWise Web installation. You can do a cleanup later.
Stopping GroupWise WebAccess (Linux)
Stop and disable the GroupWise-Tomcat" service as well as the "Apache2" service.
- systemctl stop apache2
- systemctl disable apache2
- systemctl stop grpwise-tomcat
- systemctl disable grpwise-tomcat
Stopping GroupWise WebAccess (Windows)
To stop the GroupWise WebAccess services on Windows, go to your Services page in the Windows Control panel.
- Stop and disable the "GroupWise-Tomcat" services.
GroupWise Web Won't Load due to IP Tables Issue
You may have an issue starting Docker/GroupWise Web due to this reported error with IP Tables.
linux-nd2d:/opt/novell/gw/certs # sudo docker run -d --rm -v /opt/novell/gw:/etc/nginx/gw --name gwweb -e FQDN=webmail.redjuju.com -e DNS_SERVER=192.168.0.147 -p 80:80 -p 443:443 -v /opt/novell/gw/certs:/certs mfgroupwise/web:latest
dab49d1c177d2f9d14f5858603786b1380bbc93e82393da07593d8d3d2e4f964
docker: Error response from daemon: driver failed programming external connectivity on endpoint gwweb (fa30308610eca777536c9551ff6bd7c79f80e2f7d0c047d7b9c1e1eb79b39cd9): (iptables failed: iptables --wait -t nat -A DOCKER -p tcp -d 0/0 --dport 443 -j DNAT --to-destination 172.17.0.2:443 ! -i docker0: iptables: No chain/target/match by that name.
(exit status 1)).
This is an error that you may get if your firewall service is stopped. When I have received this error, I resolve it by ensuring that the firewall is running before I try to start the GroupWise Web application in Docker.
systemctl start firewalld
There is a SUSE TID here that discusses iptables and conflicts with the firewall. https://www.suse.com/support/kb/doc/?id=000019095
Path Issue for SSL Certificates on the GWDVA
You may have trouble getting the GroupWise DVA to activate HTTPS due to what appears to be a path issue with the SSL certificate file. The gwdva log file (/var/log/novell/groupwise/gwdva) reported this error:
01-24-21 11:47:35 Maximum Conversion Time Limit: 360 (Default)
01-24-21 11:47:35
01-24-21 11:47:35 File Conversion Settings:
01-24-21 11:47:35 Default Language: en
01-24-21 11:47:35 Temporary File Path: /var/opt/novell/groupwise/gwdva/temp
01-24-21 11:47:35 01-24-21 11:47:38 Unable to locate SSL Certificate [opt/iso/cert/dva.crt]
01-24-21 11:47:38 Initializing worker processes 01-24-21 11:47:38
What I found in my situation was that it had nothing to do with the path or the certificate. The problem was that my SSL Key File password had special characters in it that seemed to throw off how the configuration file was parsed and loaded.
The solution to this issue is to make sure that you only use common special characters and not characters that are typically reserved. I believe all the characters on top of the numbers (!@#$%^&*) are fine but you may have to test it.
Quickfinder Process Stops Working on Post Office Agent
This is not a problem with GroupWise Web, but a possible side effect of enabling SSL on the DVA as required by GroupWise Web. I have seen cases where the post office doesn't seem to be aware that the DVA is running and using SSL, or it's trying to connect via HTTP when it needs to connect to it via HTTPS. Symptoms could be as follows on the Post Office Agent:
Emails from the Post Office Agent
MADDM.KAPO QuickFinder Indexing will not start until the configured DVA is active
Post Office Agent Log Files
20:00:00 10FA QuickFinder Indexing will not start until the configured DVA is active
20:00:00 10FA QuickFinder indexing thread exits prematurely
GWDVA Status on the POA Web Console
| GroupWise POA Configuration Settings | |
| General Settings: | |
| Post Office Directory: | /groupwise/mybigpo |
| Post Office Access Mode: | Client/Server Only |
| Post Office Configuration Instance: | poa |
| Post Office Language: | en |
| Database Version: | 1830 |
| Internet Domain Name: | sample.com |
| Read Configuration from Database: | Yes |
| Error Mail to Administrator: | Yes |
| IPV6 Protocol: | Disabled |
| IP Address Redirection Table: | Show |
| QuickFinder Indexing: | Enabled |
| Document Viewer Agent: | dva (192.168.2.147:8301 ) (Offline) |
| QuickFinder Document Converter Agent: | Not Started |
| QuickFinder Indexing Base Offset (hours from Midnight): | 20 Hours 0 Mins (Default) |
| QuickFinder Indexing Interval: | 2 Hours 0 Mins |
Solution
Most likely, restarting the POA will correct this issue. I have tried to track it down and duplicate it, but I'm not able to catch the trigger, nor am I able to duplicate it once I've fixed it. The goal is for the POA to show the GWDVA as online. As long as it shows online, the Quickfinder will run on schedule.
Cleanup / Uninstall of old GroupWise WebAccess
The GroupWise Web installation does not uninstall the old GroupWise WebAccess. In fact, you'll notice that when you install GroupWise 18.3, there are no options at all related to GroupWise WebAccess on the installation menu.
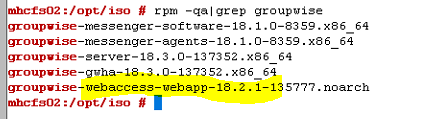
You can see here on this Linux server that I have the GroupWise agents upgraded to version 18.3, but the WebAccess version 18.2.1 remains. Also note that there is no RPM install for the new GroupWise Web, so it will not show up in the list of installed RPM's.
GroupWise WebAccess is completely absent from the GroupWise 18.3 installation menu. The new GroupWise Web is also not part of this installation procedure.
GroupWise 18.3 Installation Dialog on Linux

GroupWise 18.3 Installation Dialog on Windows

Uninstalling GroupWise WebAccess (Linux)
Uninstall the Linux agents using the rpm command.
- First, you must find the version of WebAccess that is running.
rpm -qa|grep groupwise
result:  groupwise-webaccess-webapp-18.2.1-135777.noarch
- Use the results to determine the command line for uninstall. The rpm build in the previous command shows you the name for the uninstall.
rpm --erase groupwise-webaccess-webapp-18.2.1-135777.noarch
Uninstalling GroupWise WebAccess (Windows)
In order to fully uninstall GroupWise WebAccess from Windows, you must do the following:
- Uninstall GroupWise WebAccess from the Programs and Features list.
- Uninstall “Apache Tomcat 9.0 Tomcat 9” from the Programs and Features list.
- The uninstall process should also delete the "Apache Tomcat 9.0 Tomcat9" service that is running in the Services list in the control panel. You should check and confirm that it is gone. If it does not clean it up automatically, you can issue the command "sc delete Tomcat9" at the command prompt.
- You may want to remove the folder c:/Novell/Groupwise/Tomcat and c:/Novell/WebAccess (Use caution).
View of Add/Remove Programs when GroupWise WebAccess 18.2.1 is installed on Windows.

The Apache Tomcat service that is typically running when GroupWise WebAccess 18.2.1 is installed on Windows.
